Thursday, December 23, 2021

Get selected radio button value in LWC

This post explains how to get selected radio button in LWC. Below is demo of output :

Get selected radio button value in LWC

To use the radio button in LWC you have to use the lightning-radio-group tag. you can get the value of the selected radio button with the help of event.target.value .

RadioButton.cmp :

<template>
    <div style="background:white;padding:10px;">
        <lightning-radio-group name="RadioGroup"
                                label="SFDC"
                                options={options}
                                value={value}
                                onchange={valChange}
                                type="radio">
        </lightning-radio-group>
        <br/>
        <div>* Selected value is <b>{value}</b></div>
    </div>
</template>

RadioButton.js:

import { LightningElement } from 'lwc';
export default class RadioButton extends LightningElement {
    value = 'LWC';
    get options() {
        return [
            { label: 'LWC', value: 'LWC' },
            { label: 'SALESFORCE', value: 'SALESFORCE' },
            { label: 'LIGHTNING COMPONENT', value: 'LIGHTNING COMPONENT' },
        ];
    }
    valChange(event){
        this.value = event.target.value;
    }
}

RadioButton.meta:

<?xml version="1.0"?>
<LightningComponentBundle xmlns="http://soap.sforce.com/2006/04/metadata">
    <apiVersion>51.0</apiVersion>
    <isExposed>true</isExposed>
    <targets>
        <target>lightning__RecordPage</target>
        <target>lightning__AppPage</target>
        <target>lightning__HomePage</target>
        <target>lightningCommunity__Page</target>
        <target>lightningCommunity__Default</target>
    </targets>
</LightningComponentBundle>


Thanks, 
Lovesalesforceyes


Saturday, December 18, 2021

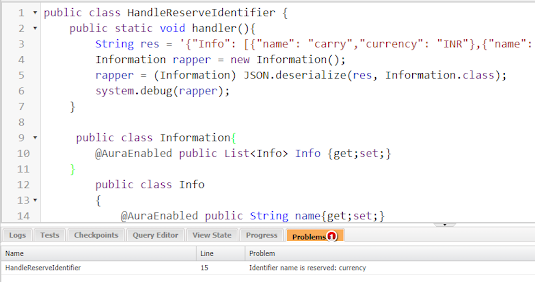
How to handle Identifier name is reserved error in apex json response

This post explain how to handle Identifier name is reserved error in apex json response.


Handle Identifier name is reserved error in apex json response

To handle the reserved identifier name in apex you have to replace the reserved variable with some non reserved variable and also change the wrapper variables accordingly. Refer the following code:


HandleReserveIdentifier.apx:

public class HandleReserveIdentifier {
    public static void handler(){
        String res = '{"Info": [{"name": "carry","currency": "INR"},{"name": "max","currency": "CLPs"}]}';
        res = res.replace('currency','currency1'); // Replace reserved identifier with some non-reserved identifier
        Information rapper = new Information();
        rapper = (InformationJSON.deserialize(res, Information.class);
        system.debug(rapper);
    }
    
     public class Information{
        @AuraEnabled public List<InfoInfo {get;set;}
    }
        public class Info
        {
            @AuraEnabled public String name{get;set;}
            @AuraEnabled public String currency1{get;set;}
        }
}


Thanks, 
Lovesalesforceyes

Wednesday, December 15, 2021

How to schedule salesforce certification exam

This post explains how to schedule a salesforce certification exam. 1.) Go to https://www.webassessor.com 2.) Create a new account and enter all the valid information. If you already have an account, simply login. 3.) After that click on Register for an exam tab.

How to schedule salesforce certification exam

4.) Choose the exam type which you want to give. 5.) After that you will see two options onsite and online. If you want to give the exam at the exam center click on site otherwise if you want to give the exam at your place then select online. 5.) After that you have to select the date and time when you want to give the exam. Date and time shown there is according to your country. 6.) Complete the payment process. That's it. 7.) Before the exam, complete your biometric process and install sentinel software. You will receive the mail regarding your scheduled exam in which there are few important links regarding exam and required requirements. 


Thanks, 
Lovesalesforceyes


Wednesday, December 8, 2021

PD1 Important questions Part 1

 1.) A developer creates a custom exception as shown below:

public class partiyException extends exception{}

what are two ways the developer can fire the exception in apex ?

choose 2 answers

A. throw new parityException('parity does not match');

B. new ParityException('parity does not match');

C. new ParityException();

D. throw new ParityException();

Answer: A,D


2.) Which two sfdx commands can be used to add testing data into a developer sandbox?

Choose two answers

A. force:data:bulk:upsert

B. force:data:object:create

C. force:data:tree:import

D. force:data:async:upsert

Answer: A,C


3.) The following automation already exist on the Account object:

  • A workflow rule that update a field when a certain criteria is met
  • A custom validation on a field
  • A flow that updates related contact records
  • A developer creates a trigger on the account object

What should the developer consider while testing the trigger code?

A. The flow may be launched multiple times.

B. The workflow rule field update will cause the custom validation to run again.

C. Workflow rules will fire only after the trigger has commited all DML operations to the database.

D. The trigger may fire multiple times during a transaction.

Answer: D


4.) A salesforce administrator used flow builder to create a flow named "accountOnboarding". The flow must be used inside an Aura component.

Which tag should a developer used to display the flow in the component?

A. aura:flow

B. lightning:flow

C. aura-flow

D. lightning-flow

Answer: B


5.) What should a developer use to fix a lightning web component bug in a sandbox?

A. Developer console

B. Execute anonymous

C. Force.com IDE.

D. VS code

Answer: D


6.) A developer creates a lightning web component that imports a method within an Apex class. When a validate button is pressed, the method runs to execute complex validations.

In this implementation scenario, which artifact is part of the controller according to the MVC architecture?

A. XML file

B. HTML file

C. JavaScript file

D. Apex class

Answer: D


Thanks, 
Lovesalesforceyes

How to make text field read only in LWC and AURA

This post explains how to make text field read only in LWC and AURA salesforce. To make the field read only in lightning there are two ways :

  • readonly="true"
  • disabled = "true"

readOnly.html(LWC):

<template>
    <div style="padding-left:100px; width:300px;">
        <lightning-input type="text" label="This is read only field" value="Read only field" readonly/>
    </div>
    <div style="padding-left:100px; width:300px;">
        <lightning-input type="text" label="This is read only field" value="Read only field" disabled="true"/>
    </div>
</template>

readOnly.cmp(AURA):

<aura:component >
    <div style="padding-left:100px; width:300px;">
        <lightning:input type="text" readonly="true" value="Read only field" label="This is read only field" />
    </div>
    <div style="padding-left:100px; width:300px;">
        <lightning:input type="text" disabled="true" value="Read only field" label="This is read only field" />
    </div>
</aura:component>


OUTPUT :

How to make text field read only in LWC and AURA

Thanks, 
Lovesalesforceyes


Tuesday, December 7, 2021

How to use standard lightning icons in LWC and AURA salesforce

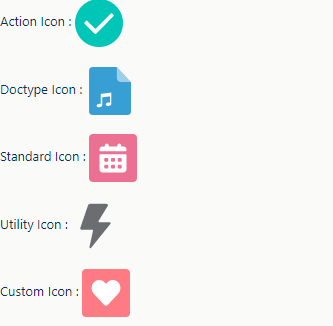
This post explains how to use standard lightning icons in LWC and AURA salesforce. Standard lightning icons are of five types and we can use these icons in our component with the help of lightning-icon tag.

  • Action Icon :  These are used to show actions which user can take.
  • Doctype Icon : These are used to show type of file.
  • Standard Icon : These are used to show standard objects and entities.
  • Utility Icon : These are used throughout the interface.
  • Custom Icon : These are used to represent custom object.

slds_Icons.html(LWC):

<template>
    <div>Action Icon : 
        <lightning-icon icon-name="action:approval" title="Approved" size="medium"></lightning-icon>
    </div><br/>
     <div> Doctype Icon :
         <lightning-icon icon-name="doctype:audio" title="Audio" size="large"></lightning-icon>
     </div><br/>
     <div> Standard Icon :
        <lightning-icon icon-name="standard:event" title="Event" size="large"></lightning-icon>
     </div><br/>
     <div> Utility Icon :
        <lightning-icon icon-name="utility:connected_apps" title="Connected" size="large"></lightning-icon>
     </div><br/>
    <div> Custom Icon :
         <lightning-icon icon-name="custom:custom1" title="custom1" size="large"></lightning-icon>
    </div>
</template>

slds_Icons.cmp(AURA):

<aura:component >
    <div>Action Icon : 
        <lightning:icon iconName="action:approval" title="Approved" size="medium" />
    </div><br/>
     <div> Doctype Icon :
         <lightning:icon iconName="doctype:audio" title="Audio" size="large" />
     </div><br/>
     <div> Standard Icon :
        <lightning:icon iconName="standard:event" title="Event" size="large" />
     </div><br/>
     <div> Utility Icon :
        <lightning:icon iconName="utility:connected_apps" title="Connected" size="large" />
     </div><br/>
    <div> Custom Icon :
         <lightning:icon iconName="custom:custom1" title="custom1" size="large" />
    </div>
</aura:component>


OUTPUT :


How to use standard icons in LWC and AURA salesforce


Thanks, 
Lovesalesforceyes


Sunday, December 5, 2021

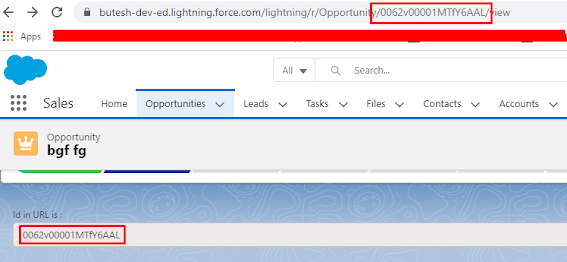
How to get Id from URL in LWC

This post explains how to get Id from URL in LWC.

getParametersFromURL.html :

<template>
    <div class="slds-p-around_medium lgc-bg">
            <lightning-input type="text" label="Url " value={urlIddisabled="true"></lightning-input>
    </div>
</template>


getParametersFromURL.js :

import { LightningElement, track} from 'lwc';
export default class getParametersFromURL extends LightningElement {
    @track urlId;
    connectedCallback() {
        var urlParameters = window.location.href;
        var urlStateParameters = urlParameters.split('Opportunity/');
        var urlIDValue = urlStateParameters[1];
        urlIDValue = urlIDValue.split('/');
        this.urlId = urlIDValue[0];
    }
}


How to get Id from URL in LWC


Thanks, 
Lovesalesforceyes

Wednesday, November 10, 2021

How to add multiple languages in salesforce community

This post explains how to add different languages in the salesforce community builder. To add multiple languages in salesforce community :

  • Setup -> All sites
  • Click builder in front of your community
  • On the left side click on the setting icon.
How to add multiple languages in salesforce community

  • You will see the multiple sub-tabs here. Click on Languages.
How to add multiple languages in salesforce community

  • From here click on the add language button and add any of the language according to your requirement.
You can also change the default language for your community from here as well.
Default language will be your community language but you can translate the content in added languages.

How to add multiple languages in salesforce community


Thanks, 
Lovesalesforceyes

Tuesday, November 9, 2021

Server side pagination in LWC and AURA salesforce

This post explains server side pagination in LWC. Below is the demo of output :


pagination in LWC


To change the number of records in a single page, change pagesize (variable in data_table.js) accordingly.


data_table.cmp :


<template>
    <div>
        <lightning-datatable
                key-field="id"
                data={caseData}
                columns={caseColumns}
                onrowaction={handleRowAction}>
        </lightning-datatable>
    </div>  

     <template if:true={showpagination}>
        <lightning-layout-item padding="around-small">
            <div class="slds-align_absolute-center">
                <lightning-button variant="base" 
                                    label="First" 
                                    disabled={disableFirst
                                    onclick={handleFirst}
                                    class="slds-m-left_x-small">
                </lightning-button>
                <lightning-button variant="base" 
                                    label="<<" 
                                    disabled={disableFirst
                                    onclick={handlePrevious}
                                    class="slds-m-left_x-small slds-m-right_x-small">
                </lightning-button>
                <template for:each={pagelistfor:item="item" for:index="index">
                    <span key={itemdata-id={itemclass="testcss slds-m-left_xx-small slds-m-right_xx-small slds-p-horizontal_x-small">
                        <b> <a class="testcss"  onclick={processMename={itemdata-id={item}>{item}</a></b>
                    </span>
                </template>
                <lightning-button variant="base" 
                                label=">>" 
                                disabled={disableNext
                                onclick={handleNext}
                                class="slds-m-left_x-small">
                </lightning-button>
                <lightning-button variant="base" 
                                label="Last" 
                                disabled={disableNext
                                onclick={handleLast}
                                class="slds-m-left_x-small">
                </lightning-button>
            </div>
        </lightning-layout-item>
    </template>
   
</template>


data_table.js :


import { LightningElement,track,wire } from 'lwc';
import loadCases from '@salesforce/apex/data_table.loadCases';

export default class data_table extends LightningElement {

    @track pagenumber = 1;
    @track recordstart = 0;
    @track recordend = 0;
    @track totalrecords = 0;
    @track pagesize = 3;
    @track totalpages = 1;
    @track showpagination=true;
    @track pagelist;
    @track isLoaded = false;
    @track caseData;
    @track caseColumns = [
    { label: 'Case Number', fieldName: 'CaseNumber', type: 'text'},
    { label: 'Subject', fieldName: 'Subject', type: 'text'},
    { label: 'Priority', fieldName: 'Priority', type: 'text'}
    ];

    @wire(loadCases, {
    pageNumber: "$pagenumber",
    pageSize: "$pagesize"
    })
    getCaseRecord(result){
        if (result.data) {
            this.caseData = result.data.caseList;
            this.totalrecords = result.data.totalRecords;
            this.recordstart = result.data.recordStart;
            this.recordend = result.data.recordEnd;
            this.totalpages = Math.ceil(this.totalrecords / this.pagesize);
            this.generatePageList(this.pagenumber, this.totalpages);

            this.isLoaded = false;
            if(this.totalpages==1){
                this.showpagination=false;
            }else{
            this.showpagination=true
            }
        }
    }


    renderedCallback(){
        this.template.querySelectorAll('.testcss').forEach((but) => {
            but.style.backgroundColor = this.pagenumber===parseInt(but.dataset.id,10) ? '#F47920' : 'white';
            but.style.color = this.pagenumber === parseInt(but.dataset.id, 10) ? 'white' : 'black';
        });
    }


    handleFirst(event) {
        this.isLoading = true;
        var pagenumber = 1;
        this.pagenumber = pagenumber;
    }

    processMe(event) {
        var checkpage = this.pagenumber;
        this.pagenumber = parseInt(event.target.name);
        if (this.pagenumber != checkpage) {
        this.isLoading = true;
        }
    }

    get disableFirst() {
        if (this.pagenumber == 1) {
        return true;
        }
        return false;
    }

    get disableNext() {
        if (
        this.pagenumber == this.totalpages ||
        this.pagenumber >= this.totalpages
        ) {
        return true;
        }
        return false;
    }

    handlePrevious(event) {
        this.isLoading = true;
        this.pagenumber--;
    }

    handleNext(event) {
        this.isLoading = true;
        this.pagenumber = this.pagenumber + 1;
    }

    handleLast(event) {
        this.isLoading = true;
        this.pagenumber = this.totalpages;
    }

    generatePageList = (pagenumber, totalpages) => {
        var pagenumber = parseInt(pagenumber);
        var pageList = [];
        var totalpages = this.totalpages;
        this.pagelist = [];
        if (totalpages > 1) {
            if (totalpages < 3) {
                if (pagenumber == 1) {
                    pageList.push(12);
                }
                if (pagenumber == 2) {
                    pageList.push(12);
                }
            } else {
                if (pagenumber + 1 < totalpages && pagenumber - 1 > 0) {
                    pageList.push(pagenumber - 1, pagenumber, pagenumber + 1);
                } else if (pagenumber == 1 && totalpages > 2) {
                    pageList.push(123);
                } else if (pagenumber + 1 == totalpages && pagenumber - 1 > 0) {
                    pageList.push(pagenumber - 1, pagenumber, pagenumber + 1);
                } else if (pagenumber == totalpages && pagenumber - 1 > 0) {
                    pageList.push(pagenumber - 2, pagenumber - 1, pagenumber);
                }
            }
        }
        this.pagelist = pageList;
    };

}


data_table.apx :


public with sharing class data_table {
    @AuraEnabled(cacheable=true)
    Public static caseDataWrapper loadCases(Decimal pageNumber,Decimal pageSize){
        caseDataWrapper res = new caseDataWrapper();
        Integer pSize;
        if(pageSize!=null && pageSize!=0.0){
            pSize = (Integer)pageSize;    
        }else{
            pSize=10;  
        } 
        Integer pNumber = (Integer)pageNumber;
        Integer offset = (pNumber - 1) * pSize;
        list<case> c = new list<case>();
        String query = 'Select id,CaseNumber,Subject, priority from Case LIMIT :pSize OFFSET :offset';
        String countQuery = 'select count() from case';
        c = Database.query(query);
        res.caseList = c;
        res.totalRecords = Database.countQuery(countQuery);
        res.recordStart = offset + 1;
        Integer recordEnd = pSize * pNumber;
        res.recordEnd = res.totalRecords >= recordEnd ? recordEnd : res.totalRecords; 
        return res;
    }

    public class caseDataWrapper {
        @AuraEnabled
        public Integer totalRecords {get;set;}
        @AuraEnabled
        public Integer recordStart {get;set;}
        @AuraEnabled
        public Integer recordEnd {get;set;}
        @AuraEnabled
        public List<case> caseList {get;set;}
    } 
}


Thanks, 
Lovesalesforceyes

Saturday, November 6, 2021

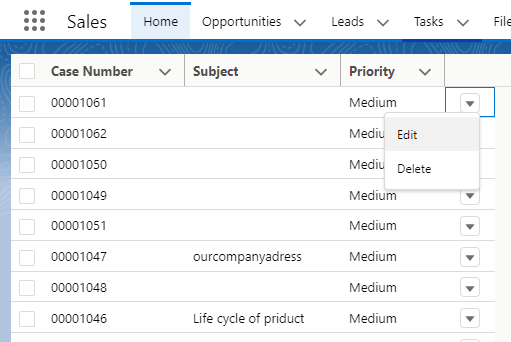
How to add menu button in lightning datatable salesforce

This post explains how to add menu button in lightning datatable in LWC and AURA. Below is the demo of output :


How to add menu button in lightning datatable salesforce


menuButton.cmp :


<template>
    <div>
        <lightning-datatable
                key-field="id"
                data={caseData}
                columns={caseColumns}
                onrowaction={handleRowAction}>
        </lightning-datatable>
    </div>    
</template>


menuButton.js :


import { LightningElement,track,wire } from 'lwc';
import loadCases from '@salesforce/apex/data_table.loadCases';

const actions = [
{ label: 'Edit', name: 'Edit' },
{ label: 'Delete', name: 'Delete' },
];

export default class menuButton extends LightningElement {
    @track caseData;
    @track caseColumns = [
    { label: 'Case Number', fieldName: 'CaseNumber', type: 'text'},
    { label: 'Subject', fieldName: 'Subject', type: 'text'},
    { label: 'Priority', fieldName: 'Priority', type: 'text'},
    {
    type: 'action',
    typeAttributes: { rowActions: actions },
    }
    ];

    @wire(loadCases)
    getCaseRecord(result){
        if (result.data) {
            this.caseData = result.data;
        }
    }

    handleRowAction(event){
        const actionName = event.detail.action.name;
        if(actionName == 'Edit'){
            // Edit operation
            console.log('Edit');
        }
        if(actionName == 'Delete'){
            // Delete operation
            console.log('Delete');
        }
    }
}


data_table.apx :


public with sharing class data_table {
    @AuraEnabled(cacheable=true)
    Public static list<case> loadCases(){
        list<case> c = new list<case>();
        String query = 'Select id,CaseNumber,Subject, priority from Case';
        c = Database.query(query);
        return c;
    }
}


Thanks, 
Lovesalesforceyes

Get selected radio button value in LWC

This post explains how to get selected radio button in LWC. Below is demo of output : To use the radio button in LWC you have to use the  li...