Sunday, March 14, 2021

How to use regex in LWC

 This post explains how to use regex in LWC. Below is demo of output :

use regex in lwc

regex_In_LWC.html :


    <template>
        <lightning-input type="text" onchange ={handleValue} 
label="Enter Text">
        </lightning-input>
        <lightning-button type="submit"
            name="Apply Regex"
            label="Apply_Regex"
            onclick={handleclick}>
        </lightning-button>
    </template>


regex_In_LWC.js


    import { LightningElementtrack } from 'lwc';

    export default class Regex_In_LWC extends LightningElement {
        @track Text

        handleValue(event){
            this.Text = event.target.value;
        }
        handleclick(event){
            var myReg = /love(.*?)yes/;
            var MyText = this.Text;
            var Result = MyText.match(myReg);
            alert('after apply regex '+this.Text+' => '+Result[1]);
        }
    }


regex_In_LWC.Meta


    <?xml version="1.0" encoding="UTF-8"?>
    <LightningComponentBundle 
xmlns="http://soap.sforce.com/2006/04/metadata" >
        <apiVersion>45.0</apiVersion>
        <isExposed>true</isExposed>
        <targets>
            <target>lightning__AppPage</target>
            <target>lightning__RecordPage</target>
            <target>lightning__HomePage</target>
        </targets>
    </LightningComponentBundle>


 In the js file there is three variable :

  1.  myReg : In this variable you have to pass the pattern which you want to apply on string. I am giving the pattern to fetch string between love and yes.
  2. MyText : In this variable you have to pass the string in which you want to apply the pattern.
  3. Result : This variable is used to store results. MyText.match(myReg); is used to find pattern from string.
You can make your own pattern and apply it to the string.


Output :


how to use regex in lwc


Thanks, 
Lovesalesforceyes

Friday, March 5, 2021

Salesforce and java integration with rest api

Before starting salesforce java integration, let's discuss the requirements needed to integrate java and salesforce with rest api. 

There are five variables in code which you need to understand what they are :

1.) userName  = Username of salesforce credentials.

2.) passWordAndToken = Password of salesforce and security token combined without any space. If your password is ABC and token is 123 then passWordAndToken is ABC123. You can generate token by My setting => Personal => Reset my security token

3.) loginEnvUrl = If you want to login production then loginEnvUrl is "https://login.salesforce.com" but if you want to login production then loginEnvUrl is "https://test.salesforce.com".

4.) clientId and clientSecret = You can get clientId and clientSecret by setup => create => Apps => connected apps

Connected Apps Salesfore


Client Key and Client Secret


Jars required :

You will need four jar files for this integration and the four jars are required otherwise you will get an error. I am providing the link to all the jar files you can download from here.

Salesforce_Java_Integration_Jars


Java Code :

package Integration;
import org.apache.http.Header;
import org.apache.http.HttpResponse;
import org.apache.http.HttpStatus;
import java.net.URLEncoder;
import org.apache.http.client.HttpClient;
import org.apache.http.client.methods.HttpPost;
import org.apache.http.impl.client.HttpClientBuilder;
import org.apache.http.message.BasicHeader;
import org.apache.http.util.EntityUtils;
import org.json.JSONObject;
import org.json.JSONTokener;
public class Salesforce_Java_Integration {

public Salesforce_Java_Integration()
{
final String baseUri;
final Header prettyPrintHeader = new BasicHeader("X-PrettyPrint", "1");
final Header oauthHeader;
final String userName  = "n*********gmail.com";               
final String passWordAndToken  = "***************************";    
final String loginEnvUrl  = "https://login.salesforce.com";
final String GRANTSERVICE = "/services/oauth2/token?grant_type=password";
final String clientId     = "3MVG97quA*************************bfh";
final String clientSecret = "7117DE190*****************FD40809299AE";

HttpResponse response = null;
HttpClient httpclient = HttpClientBuilder.create().build();
// Create login request URL
String loginURL = "";
try {
loginURL = loginEnvUrl + GRANTSERVICE +
"&client_id="+URLEncoder.encode(clientId, "UTF-8")+
"&client_secret=" +clientSecret +"&username=" +
URLEncoder.encode(userName, "UTF-8") +
"&password=" +URLEncoder.encode(passWordAndToken , "UTF-8");

System.out.println("loginURL---- "+loginURL);
HttpPost httpPost = new HttpPost(loginURL);
{
// POST request to Login
response = httpclient.execute(httpPost);
if(null!=response) {
final int statusCode = response.getStatusLine().getStatusCode();
if (statusCode == HttpStatus.SC_OK) {
System.out.println("Login Successfull");
}
else{
System.out.println("Error whie Login");
}
String getResult = null;
getResult = EntityUtils.toString(response.getEntity());
JSONObject jsonObject = null;
String loginAccessToken = null;
String loginInstanceUrl = null;
jsonObject = (JSONObject)
                                                              new JSONTokener(getResult).nextValue();
loginAccessToken = jsonObject.getString("access_token");
loginInstanceUrl = jsonObject.getString("instance_url");
baseUri = loginInstanceUrl;
oauthHeader = new BasicHeader("Authorization", "OAuth "
                                                    + loginAccessToken) ;
// release connection
httpPost.releaseConnection();
System.out.println("oauthHeader===>>>"+oauthHeader);
System.out.println("prettyPrintHeader===>>>"+prettyPrintHeader);
System.out.println("baseUri===>>>"+baseUri);
}
else {
System.out.println("Please check your internet connection !!!");
}
}
}
catch(Exception e) {
System.out.println(e.getMessage());
}
}
public static void main(final String[] args)
{
@SuppressWarnings("unused")
Salesforce_Java_Integration Integration = new Salesforce_Java_Integration();
}
}


OutPut:

Java Salesforce Integration

Now with the help of outhHeder, PrettyPrintHeader and baseUri you can get and set data in salesforce.


Thanks, 
Lovesalesforceyes


Thursday, March 4, 2021

Publish knowledge articles with rest api in salesforce

Whenever you create an article in salesforce its publish status is 'draft' by default. You have to publish that article to make it 'online'. In this blog we will learn how to publish draft article in salesforce by Rest API with the help of workbench :

Publish Draft article :

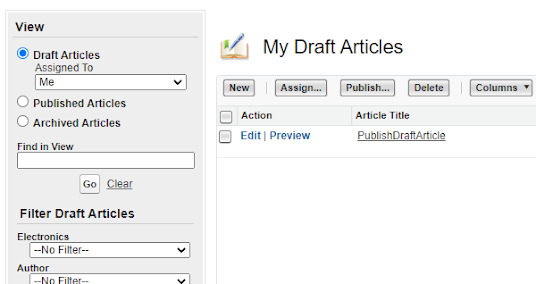
Here I am publishing one draft article. As you can see there is one one draft article in my org.

Draft articles in salesforce


First you need to find articleVersionId of the article which you want to publish. To get the articleVersionIdList you have to query on the KnowledgeArticleVersion object.

"SELECT KnowledgeArticleId, Id, PublishStatus, Title, UrlName FROM KnowledgeArticleVersion"

soql to get knowledgeVersionId


Method :- Post
URL:- /services/data/v50.0/actions/standard/publishKnowledgeArticles

Request Body :-
                        {
                            "inputs" : [
                             {
                                "articleVersionIdList" : [ "ka02x000000WGbwAAG" ],
                                 "pubAction" : "PUBLISH_ARTICLE"
                             }
                             ]
                         }


If you want to mass publish articles, you have to give comma separated id's in articleVersionIdList value in the request body.

Publish knowledge articles with workbench

Article Published:-  After executing the rest service, you can see the article is published now.

published articles in salesforce

Thanks, 
Lovesalesforceyes


Get selected radio button value in LWC

This post explains how to get selected radio button in LWC. Below is demo of output : To use the radio button in LWC you have to use the  li...